
Borg & Beck is a name synonymous around the world with high quality clutches.
Recently, an American website had the following text.
Over the past few years some company’s are claiming to be selling Borg & Beck clutch kits and pieces. These are not boxed Borg & Beck. Read moreTEST If converting from A plus verto type clutch to the original Diaphragm type these are the major components you will require: All the major extra parts required to convert from Verto Clutch to Diaphragm type parts (in brackets indicate alternatives) 6 x GHF323 shakeproof washer 3/8” UNF 2 x GFK5240 bolt remote housing short 1” UNC 1 x 88G508 flywheel keyway – pre verto (EN24T) 6 x 2A3658 clutch flywheel strap 1 x 2A3601 clutch return spring anchor 1 x CLZ628 clutch arm pin – bottom 1 x CLZ518 clevis pin for clutch arm at the top 1 x 22A747 flywheel bolt pre verto 3 x 2A3657 clutch bolt long cover to pressure 3 x (C-2A3657 ) clutch bolt long cover to pressure Read more
This article has been written owing to the increasing amount of people who ring Mini Spares stating that their 1275cc Injection type Mini will not start after fitting a new clutch... Read more
These Brake and Clutch Master Cylinders are manufactured to OEM specification
GMC171 Original Brake Master Cylinder Mini
GMC172 Brake Master Cylinder Mini Cooper S
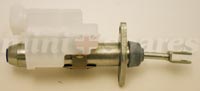
AAU4969 Clutch Master Cylinder
These Brake and Clutch Master Cylinders are manufactured to OEM specification Part Number and as such are homologated for use on original specification vehicles using DOT 4 or DOT 5 Hydraulic Fluid as specified...
Read more
To facilitate full experimentation in this area, the MS73 kit has been developed to allow accurate adjustment of rear wheel camber AND track. Adjustment of rear track can greatly influence the handling characteristics of the Mini. For reference, toe in gives straight-line performance/stability with more rear end grip (under-steer). Toe-out gives over-steer in corners, and less stability in a straight line - particularly under part/closed throttle conditions. Simple and effective caster/camber and tracking gauges are available from Mini Spares (Tool10 caster/camber gauge, TOOL11 tracking gauge) to facilitate DIY setting of geometry. Read more
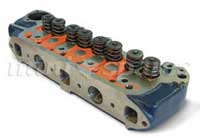
Modified to give maximum performance gain for cost. Combustion chambers, inlet and exhaust ports extensively re-worked. Smoothed finish in ports - not mirror-finish polished to minimise drag. Multi-angle valve seats in head. Cooper S size valves with current maximum flow profiles and Tuftrided for durability/longevity when used with unleaded fuel (hence 'black' finish). Combustion chamber volume used to give slight static compression ratio increase over standard. Head mods employed greatly increase volumetric efficiency, boosting actual running (dynamic) compression ratio. Read more
Apart from very first one that should be avoided at all costs (cast in part no.2A3509), there is an astonishing five other types generally available. For high-tech ones see 'Flywheels & Pressure plates - technical advances'.
22A598 - Number cast in. Standard-grade cast iron
22G270 - Number cast in. High-grade cast SG iron as fitted to Coopers and Cooper Ss Quinton Hazel - Triangular in shape, but only standard-grade cast iron.
C-AHT230 - Mini Spares high-grade SG cast iron, but cast pre-lightened. Farndon Engineering - Machined from steel billet.
The first two can be lightened, see accompanying diagram. Limit removal of metal on the rear face to 0.120" to be safe, 0.150" if you're feeling brave/lucky. Read more
If there's one subject that gets washed over when transplants or modifications are discussed its the flywheel and clutch assembly. There also seems to be a widely held belief that up-rating an engine from anything other than standard automatically requires a 'competition clutch'.
This, as with many other subjects concerning the Mini, is a myth. May be it's because the prospective transplantee needs not only a bigger/more powerful engine to amaze folk with in the bar stool bullsh*t stakes, but also anything that can be dubbed with the word 'competition'. 'Up-rated', after all, is a fairly tame word.
Although many have written much about how to modify engines, some suspension, and even on bodywork, very little has been written about the flywheel and clutch. Bit strange as it's an essential part of transferring engine power to the wheels! So let us delve into the myths and legends concerning this enigma of power transfer. Read more
To go in to all the possible permutations would take a few chapters on it’s own. Suffice to say that the Metro had a few weirdo fitments such as cable operation, an in-line ‘damper’ (some got fitted to Minis too - eek),
Terminology -
BBU - Big Bore Units
SBU - Small Bore Units
NOTE: This information is largely concerned with transplanting a large-bore engine into a small-bore engined Mini. For further information on clutch and flywheel assemblies in particular, refer to relevant separate article.
To go in to all the possible permutations would take a few chapters on it’s own. Suffice to say that the Metro had a few weirdo fitments such as cable operation, an in-line ‘damper’ (some got fitted to Minis too - eek), and ‘top-hat’ plunger and rod bearing operation. Read more
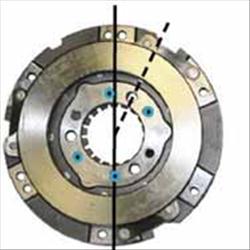
Drive Strap Alignment If the pressure plate clutch plate friction face needs re-surfacing, get it machined to clean it up. Make sure the engineering company doing the job records the amount taken off as once done, the recorded amount needs removing from the tops of the 'horns' that stick up to ensure proper clamping force is achieved. If this is not done, clutch slip is inevitable. If using a pressure plate of unknown history, it is IMPERATIVE the clutch drive straps are set at the correct height. Many get this wrong and end up with a slipping clutch for some seemingly unfathomable reason. The following should also be carried out if the flywheel has been machined, or of unknown history also: Place the pressure plate 'horns' upper-most on something to hold it off of the work surface but not interfere with clutch plate or flywheel. Place the clutch plate in position, with the protruding primary gear spline boss on the underside facing the work surface Place the flywheel in position. Read more
This is one of those areas where there is more than one way to skin the cat - depending on who you speak to. This is the method I have used for eternity, which has been totally reliable and never had a problem with.
This only applies to non-Verto type clutches, as the Verto types are not adjustable. You just have to make sure all the operating linkage components are in good order.
First off, ensure your operating linkage is up to scratch. For details on this, see 'Engine transplants - Clutch and flywheel'.
Satisfied all is OK, you can proceed with setting the linkage up.
1 - Remove/disconnect clutch return spring.
2 - Undo throw-out nuts (15/16"AF nuts on outer end of plunger) lock nut and back nuts off away from clutch cover.
Read moreThere is only one original Verto/Valeo clutch plate and is fashioned more like a ‘conventional’ clutch plate - it has a sprung centre section. Four springs around the centre section of the plate take up shock, and supposedly reduce the likelihood of judder. It was an attempt by Rover to improve the clutch take-up and engagement to make is more like a 'modern' car. Except it didn't. The engagement feels wooly at best, and judders horribly at worst. They even went as far as making two plates, one for small-bore, one for big-bore. The difference being the centre spring tensions! From experience, judder is caused by undulating flywheel/pressure plate surfaces, or ‘breakfast cereal packet’ lined non-genuine plates. It's OK, but if any warming up of the engines output is considered, definitely go for the pre Verto plate. This will fit with the Verto set-up and is a cheaper into the bargin. The Metro Turbo had a Verto flywheel type, but the clutch had the more familiar solid centre of the pre Verto assembly. Read more
There is an astonishing five other types generally available. For high-tech ones see 'Flywheels & Pressure plates - technical advances' part numbers: 22A598, 22G270, C-AHT230, Apart from very first one that should be avoided at all costs (cast in part no.2A3509), there is an astonishing five other types generally available. For high-tech ones see 'Flywheels & Pressure plates - technical advances'. 22A598 - Number cast in. Standard-grade cast iron 22G270 - Number cast in. High-grade cast SG iron as fitted to Coopers and Cooper Ss Quinton Hazel - Triangular in shape, but only standard-grade cast iron. C-AHT230 - Mini Spares high-grade SG cast iron, but cast pre-lightened. Farndon Engineering - Machined from steel billet. The first two can be lightened, see accompanying diagram. Limit removal of metal on the rear face to 0.120" to be safe, 0.150" if you're feeling brave/lucky. The third can be further lightened by carrying out the machining operation on the rear face as indicated in the diagram and as per previously stated dimensions. Read more
I'm ignoring the old original spring-type jobs here for the same reasons I wouldn't suggest using their flywheels! The first two can be lightened, see accompanying diagram. Limit removal of metal on the rear face to 0.120" to be safe, 0.150" if you're feeling brave/lucky. The third can be further lightened by carrying out the machining operation on the rear face as indicated in the diagram and as per previously stated dimensions. Do not remove any more material than indicated for any of these pressure plates as it will not only reduce their strength, but will also cause over-heating of the clutch. Too little material will not be able to absorb any excessive heat generated during spirited driving! Bear in mind what was said about lightened standard cast iron flywheels - the same applies here. Under no circumstances use lightened standard cast iron pressure plates in ANY competition disciplines. The SG iron items are suitable for full race use despite lightening operations, although further lightening of the Mini Spares C-AHT230 pressure plate is unnecessary. Read more
The Verto/Valeo type diaphragm included the pressure plate in its assembly, much like a 'normal' car set-up. The spring being of the 'finger' type as opposed to the disc spring used on earlier, three-piece assemblies. There were originally three diaphragm specifications using progressively stronger springs - small-bore, big-bore, and Metro Turbo. Later joined by the type used on the injection cars, though most definitely not interchangeable. Initially, the biggest problem was the Turbo ones were never really available on their own. If you wanted one you had to buy a whole clutch/flywheel assembly - the cost exorbitant. Rover originally believed that if the clutch plate was worn out, then the flywheel and pressure plate would be too. It has only been recent times that the diaphragm/pressure plate has been available on it’s own - but not until after the Turbo unit became unavailable. Even that has changed recently with the cessation of the Turbo diaphragm as a service part. Read more

Countless Mini enthusiasts have been dogged by primary gear bush hassles on 1275-based engines - in particular the one nearest the block (the front one). Worn ones are expensive and difficult to replace for the DIY-er because they need machining to the correct size, a job that needs to be done very accurately - a particular problem for over-seas enthusiasts. Read more
Drive Strap Alignment If the pressure plate clutch plate friction face needs re-surfacing, get it machined to clean it up. Make sure the engineering company doing the job records the amount taken off as once done, the recorded amount needs removing from the tops of the 'horns' that stick up to ensure proper clamping force is achieved. If this is not done, clutch slip is inevitable. If using a pressure plate of unknown history, it is IMPERATIVE the clutch drive straps are set at the correct height. Many get this wrong and end up with a slipping clutch for some seemingly unfathomable reason. The following should also be carried out if the flywheel has been machined, or of unknown history also: Place the pressure plate 'horns' upper-most on something to hold it off of the work surface but not interfere with clutch plate or flywheel. Place the clutch plate in position, with the protruding primary gear spline boss on the underside facing the work surface Place the flywheel in position. Read more

Contact Us| About Us| Terms| Switch to main website

Copyright @2014 Mini Spares. All rights reserved e&oe.