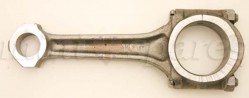
We found this fantastic article by 540 Rat on the Speedtalk Blog about "I-Beam or H-Beam – which rod is best?"
I do NOT sell connecting rods, so I have no vested interest in what rods people choose to use. But, there is so much misinformation, misunderstanding and confusion about connecting rod design, that I’ve put together a brief overview for those who are interested in knowing the Engineering FACTS, rather than relying on the incorrect info that is so common on the Internet and elsewhere. Read more

For any high performance engine an efficient crank damper puller is essential to minimise potential failure caused by harmonic vibration generated by the crank assembly. The standard type damper is barely adequate for the standard engine in normal everyday use. When used on up-rated engines to ANY degree, it has severe short-comings.
Read more

To enable use of these centre main straps, the centre main cap has to be machined flat to the nearest cut, to level the cap between the main cap bolt holes horizontal surfaces.
To achieve maximum thrust washer location, it is possible to machine the cap down its centre section using a one inch...
Read more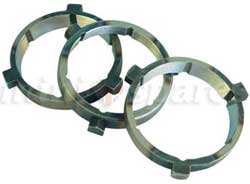
Manufactured from high-tensile manganese-bronze, these baulk rings were developed for competition use where the standard sintered metal baulk rings have proven far from adequate. This material is not to be confused with the brass/silicone- brass materials, all-over-machined, experimented unsuccessfully with by others in the late eighties/early nineties. It is a purpose-sourced material, precision cast and finished-machined using the very latest technology.... Read more
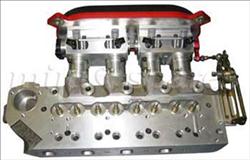
Still produced from the original tooling purchased in 1990 from Jim Whitehouse these Arden alloy 8 port heads were never a straight bolt on conversion. Designed with racing in mind it was developed in 1966/7 to take full advantage of the change to Group 2 racing regulations which allowed more freedom in cylinder head design. Read more
I frequently hear the phrase "big-bore engines tend to be unreliable long-term because of head gasket problems". Which is complete rubbish, even when non-Payen head gaskets are used.
These big-bore engines can be supremely reliable - providing the are machined and built correctly in the first place. Something that continually astonishes me doesn't happen even when engines are built by some of the self-proclaimed A-series 'experts'.
Read more
Since the inception of the newer design of this essential component, literally hundreds, if not thousands, have been sold and used. Some folks have been suspicious of the filter gauze, believing it to be too fine and therefore restrictive in flow.
Others have questioned the 360 degree, straight cut-off end, suggesting it may cause ... Read more
Every Mini owner at some point will have an issue with a broken bolt or a stripped thread, due to the fine thread on the majority of bolts fitted to these cars. Whilst most are an easy repair, such as bumper bolts, others can be a lot more difficult to repair.
An ideal example of this is the bolt for the .... Read more
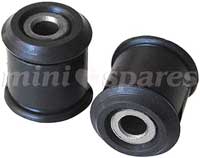
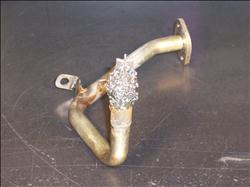
For several years now, the Mini has always struggled with wearing out engine stabiliser bushes. The combination of heat and oil on the standard rubber bushes has always caused a problem, and on standard mini’s often causes problems with making exhaust manifold downpipes blow. The widely accepted “modification” has always been to fit a set of polyurethane (or equivalent) bushes
These kits look nicer... Read more

The combustion chambers are left in a basic shape only with a nominal 16.4cc which allows enough metal for those with the latest advanced ideas of shape to apply them and create the correct compression ratios for the desired use.
Valve and seat material specification allows use of unleaded fuel. Thoroughly clean the cylinder head before final assembly. Check that the small circlip is in the correct position in the valve guide at a point where the guide protrudes through the cylinder head beneath the valve seat. Place the valve spring seat over...
Read more
When using a new unmachined cylinder block, the block face can be machined to within 0.25”(0.635mm) of the piston crown at T.D.C. This will give approximately 12.5:1 on a 1293cc engine with 13cc chamber.
If the cylinder block being used has undergone machining to bring the piston to within 0.10”(0.254mm) of the block face, machining the piston crown is necessary.
Providing forged pistons are used...
Read more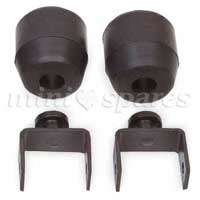
Remove existing bump stop rubber completely.
The smaller hole of the new Bump rubber should be fitted over the retainer on the bracket, using hand soap or brake fluid on the rubber if necessary to ease the fitting. It is advisable to put the metal bracket in a vice so you...
Read more
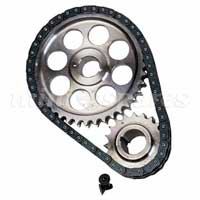
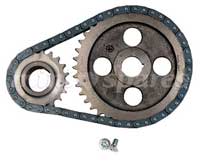
The application of this drive system maintains very accurate and consistent cam and ignition timing, and minimising valve train noise. Desirable advantages that do not diminish with time. The fiber glass reinforced belt all but eliminates excessive stretch suffered by chain driven systems - even where a tensioner is used. The protracted control of cam and ignition timing maintains peak performance. Chain drives cause excessive timing scatter, even after relatively short periods of running. Read more
The application of this drive system maintains very accurate and consistent cam and ignition timing, and minimising valve train noise. Desirable advantages that do not diminish with time. The fiberglass reinforced belt eliminates the excessive stretch suffered by chain driven systems - even where a tensioner is used. The protracted control of cam and ignition timing maintains peak performance. Chain drives cause excessive timing scatter, even after relatively short periods of running. The MINI SPARES kit enables A-series owners to benefit from such technology. The adjustable cam gear in this kit allows up to 9 degrees of adjustment, facilitating accurate cam timing. An absolute must when installing a performance camshaft.
FITMENT: Remove the original timing cover. Position gears so that the timing marks on cam and crank gears are adjacent, then remove gears/chain assembly. Remove locating keys. Clean cam and crank gear boss surfaces, ensuring new gears are no more than a light slide fit. Re-fit keys. Re-check gears for light slide fit. Read more
The front plate will have to be countersunk as shown ’X’ to take the screws AEA687, which replace the existing hexagon-headed screws, which would foul on the timing chain. Read more
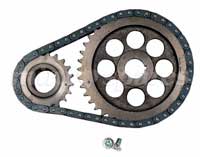
The front plate will have to be countersunk as shown “X” to take the screws CMZ407, which will replace the existing hexagon headed screws, which would foul on the timing chain. Check for clearance on chain all round and align gears as per workshop manual, When using “A” plus timing covers there is a small round pressing at the bottom which needs making flat to allow timing chain clearance. Read more
Contents
PART NUMBER DESCRIPTION QUANTITY
12G1397 CAMSHAFT SPROCKET 1
12G1699 CRANKSHAFT SPROCKET 1
2H4905 TIMING CHAIN 1
CMZ407 SCREW-COUNERSUNK 2
The front plate will have to be countersunk as shown “X” to take the screws CMZ407, which will replace the existing hexagon headed screws Read more
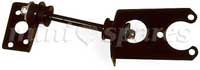
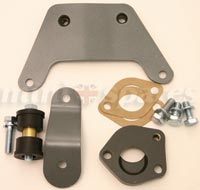
1. This is an auxiliary steady bar kit and should not be used to replace any other standard fitment parts that have broken.
2. Remove the radiator support bracket from the radiator and the thermostat housing.
3. Slacken the nut retaining the exhaust manifold at the radiator end of the engine. Remove the exhaust manifold stud by tighterning another nut against the original manifold nut and then screwing the nut out of the cylinder head.
4. Remove the three bolts securing the bulkhead blanking plate as shown in the diagram. If the car has a heater pipe as indicated on the diagram then this should be disconnected at the engine.
Read more
Contact Us| About Us| Terms| Switch to main website

Copyright @2014 Mini Spares. All rights reserved e&oe.