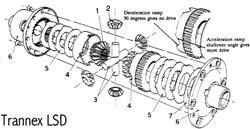
1950s design with 1990s engineering and technology - originally done by the inimitable Davc Hirons at Trannex, now under the EVO banner at Mini Spares Centre (www.minispares.com) following their buy-out of all the Mini/Sprite Trannex products some years back now. The only real similarity to the old Salisbury is the 'plate type' design - purely because it gives maximum frictional area, therefore most effective performance. Read more
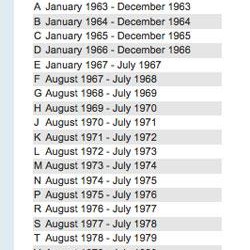
List of Vehicle Registration Letters Read more
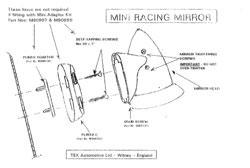
GAM107 = R/H Flat Glass
GAM107C = RH Convex Glass
GAM108 = L/H Flat Glass
GAM108C = RH Convex Glass
Read more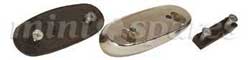
CZH3521 DIE CAST PLINTH FITTING INSTRUCTIONS
1) Drill two 6.5mm holes in the door skin at 55mm centres (N.B. Ensure that the screws will not foul the window mechanism or glass)
2) Locate the plastic grommet bosses fully into the drilled holes ensuring that the grommet is flush with the door skin.
3) Locate the die-cast plinth on the gromrnet and secure using the two coarse threaded self-tapping screws provided.
4) Locate the plastic fixing plate on the plinth and secure using the two fine threaded self-tapping screw's provided.
Read more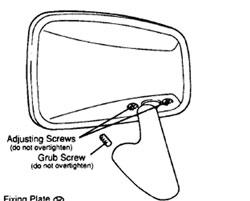
The Tex Universal Door Mirror can be fitted to a wide range of cars and light vans without having to remove door panels, by following the instructions outlined below:
With the aid of a second person, locate a clear unobstructed position for the door mirror when viewed from the driving seat. Read more
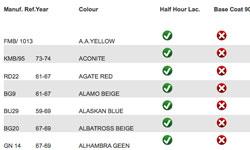
A yes denotes that a mixing formula is available in the finish indicated.
A no in any column indicates that at time of printing, no mixing formula was available.
A 'v' signifies that colour variants are available in our Half Hour Lacquer product
Read more

A yes denotes that a mixing formula is available in the finish indicated.
A no in any column indicates that at time of printing, no mixing formula was available.
A 'v' signifies that colour variants are available in our Half Hour Lacquer product
Read more
Vertical rear moulding for the Estate and Traveller rear side windows.
With the double row channel grooves facing upwards. This is a side view elevation.
This channel will require the ends to be cut exactly as above to the original angle of 20 degrees and the correct length as shown which ensures the best fitment. As the material is not the easiest to cut cleanly it is recommended that a new hacksaw blade or good quality snips are used and the channel grooves are packed with wood splints.
Alternatively, you can use your old original sample as a template. Read more
These downloadable templates can be printed out to scale to help you fit the sportspack for: - MS135 - WHEEL ARCH SET OF 4 GENUINE SPORTSPACK ARCHES Read more

The cable bracket is made to fit universally and will replace the original bracket as tacked in on the latest Minis. The funny looking tag, which points to the heater, is used on later cars to hold a relay and the single bolthole faces the front. This bracket should be fitted about 3" back from the lower padded rail of the parcel shelf and 5-6" from the R/H door seal. Ensure the choice of bolt holes in the cable bracket lines up with metal on the parcel shelf as latest vehicles have gaps (visible from underneath) and the plastic cloth of the parcel shelf would tear. Read more
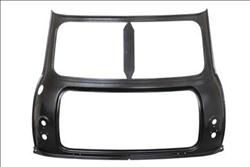
The latest exciting addition to the Mini body panel range is the full mini rear panel, pressed using original tooling, but with a unique modification to allow the provision of Mk1 Rear Lamps to be fitted.
The panel is hand finished by Heritage craftsmen to ensure the highest panel quality. Only available as a full repair panel, the aperture for the rear window... Read more
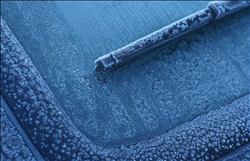
In order to keep your Mini in full working order this winter, we have put together a small guide of things to check, besides the routine servicing
Cooling System
Antifreeze is a must in a Mini for the winter. A Winter mix of Antifreeze to water over the winter will stop any potential problems with freezing conditions.
Cooling Hoses. Check the condition of all... Read more
The badge is pre-shaped to allow easy and permanent fitting to boot lids.
This badge fixes to the body by the double sided tape attached to each letter and the area where they are to be fixed MUST be cleansed of all polish, wax or road grime by using T Cut or any suitable chemical. Peel off the outer protective tape coating and then firmly place in desired position. You can then polish around the badge to retain the ideal sheen. Failure to clean the fitting area first will result in poor adhesion.
Read more24G1201 Austin Bonnet Badge Fitting Guide
To ensure correct fitment of this badge, a packing piece needs to be fitted between the body and the badge (i.e. a small piece of sponge)
Read more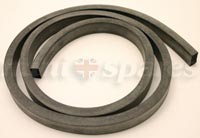
This is the original thicker bonnet seal that was glued on the bonnet scuttle panel drainage channel.
Early cars had a full width seal 38.5”whereas later cars used 36.5” leaving some of the wing drainage channel clear. Trim the ends to your requirement.
Read moreFitting Instructions
Remove grille and overriders (if fitted the overriders can’t be refitted) Remove the centre fixing nut from the bumper, fit the centre support bracket using the bumper nut and washer, bending the bracket towards the apron mark off and drill hole after offering bar up. Loosely assemble the 2 end brackets and then check alignment. The right angled sections of the brackets bolt to the front panel and lower part of the apron. Contents: Lamp Bar Right Hand Bracket Left Hand Bracket Centre Bracket
Read more
This bracket is designed to adjust the rake/height of the steering column and wheel. Incorrect fitment will cause premature wear and damage to steering column and rack, so the following MUST be adhered to.
1. Remove column to mounting bracket shear bolt. If the bolt head has actually been sheared off, this is easily accomplished using a small centre or pin punch, working around the edge of the... Read more

This window channel is now supplied without water drain holes
The drain holes can be identified as the larger 6.5mm holes in the chromium plated glazing strip.
The smaller holes in the glazing strip are used for fastenings to affix the channel and glazing strip to the door frame.
TO MAKE DRAIN HOLES IN CHANNEL;
Use chromium plated glazing strip as a template.
Mark drain holes on closed face of Channel.
Using a 3mm drill bit, carefully drill pilot holes through closed face of channel as marked. Read more
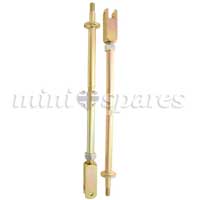
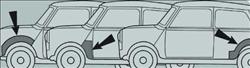
These rods have been produced to improve car stability when cornering and braking and to facilitate easy adjustment of caster angle. Manufactured from a high-grade material in a much bigger diameter they are less susceptible to bending than the standard items. Read more

Contact Us| About Us| Terms| Switch to main website

Copyright @2014 Mini Spares. All rights reserved e&oe.