
The X-pin concept grew out of development work carried out by David Hirons in the mid Eighties to resolve the problem of persistent diff bevel gear and carrier failure on rear wheel drive Ford Escorts and Lotus Cortinas. The torque capacity of the diff could be increased by adding two extra bevel gears.
Read more
The world famous 5 speed close ratio gearbox design project was engineered for Mini Spares by David Hirons.
Using over 58 extra parts plus extensive machining the 5th gear is technically an overdrive gear 0.882-1 which equates to 3.037 when using 3.44 crown wheel and pinion.
Read more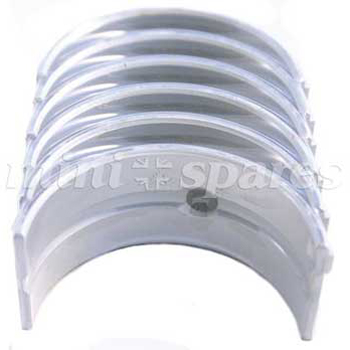
ACL Race series bearings are precision manufactured to a wall thickness of ±0.0040mm giving engine builders close control of vertical oil clearance. ACL Race bearings help to, optimise high pressure oil film generation....
Read more
Any straight cut or helical competition gear set needs to be assembled by a trained mechanic and adhere to the following. Never fit lock tabs to the mainshaft and 1st motion shaft. Read more

This is to help you understand which mini you own from a spare parts point of view. Officially There were only Mk1/Mk2 and Mk3 on sales brochures but the Mk4 was introduced by Keith Dodd in 1976 to help people understand the main parts changes. From here we eventually got to MK7
What mini do you own-Make your Mark from this list Confused what mini you own,... Read more

Cold running and why tuned Minis simply quit running when pulling up.
Winter is coming, and with it various issues that affect Minis used throughout the year, no matter what the conditions.
This month's consideration is cold running and why a plethora of tuned Minis simply quit running when pulling up. Ignoring the few that are down to various other ailments, the main issue is just the cold weather. Those that suffer more ... Read more
It’s criminal. Folk spend fortunes putting together super-sonic motors, only to skimp on the oil they use. Why? Oil’s oil right? Wrong. Read more
To scatter or not to scatter, that is the question. This whole 'scattering' deal has befuddled many. The only real prose produced on the subject, and 'advice' handed out by many so-called 'specialists' tends to be somewhat tainted with large chunks of mysticism - inferring there's some kind of black art involved. The simple fact is the principle is very basic and easy; it's getting a cam with the right profile and figures applied to it that will actually work as a scatter profile that's the hard part. And this article does not mean I am all for scatter pattern cams. I will illuminate… We are all pretty much aware that the A-series is a real oddity, largely because of the siamese (shared) port work - cylinders 1 & 2 share an inlet port, cylinders 3 & 4 share an inlet port, and cylinders 2 & 3 share an exhaust port. Very weird compared to the more familiar head designs found on almost every other engine type that has one inlet and one exhaust port per cylinder. Read more
To avoid lots of swearing and unnecessary damage, check the timing gears slide neatly onto their respective bosses. If tight, first check for any high spots in the gear bores and key-way slots. Clean out using with fine emery cloth, medium Wet 'n' Dry paper, or some such. Remove the Woodruff keys then dress the bosses using abrasive material as mentioned previously. Re-check fitment before re-fitting keys. Check the key-ways and keys too before re-fitting. Get rid of unwanted sticky-out bits on the keys that would inhibit a slide fit. Clean out the key-way and de-burr top edges. I always file a slight 'flat' across them to give plenty of clearance to the gear key slot. If the pulley is a slack fit on the key, turn it anticlockwise before nipping the bolt up. ALWAYS fit it like this. It's imperative to fit cam (and followers in the case of solid wall blocks) following manufacturers instructions precisely using a good quality cam lube. Read more
CAM TIMING - Mechanical Method Part No Applications: MD256, MD266, MD276, MD286, MD286SP, MD296, MD296SP, MD310SP, MD530, MDM266/KIT, MDM276KIT, MDM286KIT Equipment required - Stop plate - mechanical stop plate for setting TDC (see text). Set of feeler blades Terminology - TDC - Top Dead Centre, when piston is at highest point in bore BTDC - Before Top Dead Centre, before piston reaches highest point in bore ATDC - After Top Dead Centre, after piston has reached highest point in bore Accurate piston position indication is the first goal. You need to know exactly when piston one is at TDC. Without engineering measuring equipment a ‘stop plate’ is required. This you will either have to manufacture personally, or get one made. You need a piece of metal plate long enough to span the bore plus a couple of the head stud holes on either side - about 4.750" long by 1.375" wide will do the trick. Read more
Equipment required - one 0.500” minimum capacity DTI with magnetic stand, 360-degree protractor and a piece of reasonably thick gauge wire to use as a pointer. Terminology - DTI - Dial Test Indicator/dial gauge Protractor - degree wheel TDC - Top Dead Centre, when piston is at highest point in bore BTDC - Before Top Dead Centre, before piston reaches highest point in bore ATDC - After Top Dead Centre, after piston has reached highest point in bore. Rotate crank so piston one is at the bore top (TDC). Fit timing gears 'dot-to-dot'. Set up DTI with stem resting on number one piston centre with a little preload. Rotate crank backwards slightly (anti-clockwise looking at the front), then gently forwards observing the DTI, watching where the needle stops before descending. This is TDC. Repeat this procedure, stopping when the needle reaches its zenith. Zero the dial scale, and repeat until satisfied the needle shows zero on the scale. Read more
Technical lowdown on shock absorbers,what to look for and what to buy Having introduced the fairly unknown Kayaba (KYB) range to the mini market in 1997 I am still amazed how gullible people are when buying cheap dampers. I have tried every type popular type available in the last 35 years, Armstrong including their adjustables, Girling, lockheed, Koni, Spax., Avo, Bilstein,Monroe,Boge,Gabriel and GMax The best to date were probably the very expensive special design Koni adjustables that we had built for the Monte Carlo rally. I also used the spare set on my 8 port car. You get what you pay for? For a non adjustable, Bilsteins rate highly although like the Koni specials are expensive, but you get what you pay for. The essence of a quality damper is to upgrade performance by using more sophisticated higher quality component build in the valving, piston, rod and seals etc along with a performance upgrade to improve the cars road holding. Read more
Suspension - Basic priorities for improved suspension performance. Having studied the 'Suspension - Terminology' article you should now have a ‘job description’ understanding of previously possibly un-comprehended words associated with suspension control. Now - what to do with it? The first thing we need to establish is an order of priority before distributing hard-earned 'beer vouchers' in all directions. Fortunately, this is a good deal less complicated than is generally believed. Despite the five main factors that control the front suspension geometry – kingpin inclination, caster angle, camber angle, track, and bump-steer – we are only really able to alter three of those easily. King-pin inclination is non-adjustable, as it’s a feature of where the swivel-pins are mounted on the hub at the factory. It will alter as other adjustments are made, but we can do nothing easily about correcting/optimising it independently, as these are fixed in position on the swivel hub. Read more
Glossary of terms used in the suspension on the mini. The Mini has consistently more than proven its capability in competition with very limited and cost-effective modifications based on the standard equipment fitted. Having first ensured the bodyshell (in reality little more than a complex bracket to hold suspension and driver securely in place) is well sorted out by removing all cruddy or rotten metalwork and into something like straight, square and strong we, maximising suspension stability and geometry pays dividends in the enjoyment that is driving a Mini. Understanding what the individual ingredients are helps in pursuing what you want from the experience. Smooth Mover Good, reliable, and consistent handling is dependent on a number of factors. At this stage, we’re concerned with clapped out or badly adjusted suspension components. Stiff, seized, partially seized or slack, sloppy, worn out suspension components will cause inconsistent, wayward, confusing and – more importantly - unsettling handling quirks that may take some time to track down. Read more

This bar has been developed to complement those road cars fitted with post 1990 rubber springs. Being the softest compound yet used on the Mini in an attempt to improve comfort, they allow more body-roll. This bar will not only reduce body-roll, but also slightly reduce dive under braking and squat under acceleration. The bar is aimed at the general daily driver. For more progressive drivers it is highly recommended that its used in conjunction with rear anti-roll bar kit C-AJJ4009. By testing various settings its possible to attain a very well balanced fast road car with improved steering response to compliment the other advantages of these bars. It is made to only fit the standard diameter/dimensioned tie-rods. Read more


Contact Us| About Us| Terms| Switch to main website
Copyright @2014 Mini Spares. All rights reserved e&oe.