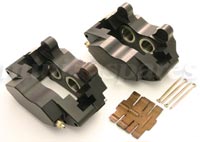
These calipers are intended for use on 12” wheels with 8.4”diameter solid discs.
When fitting vented discs, spacers are required to fit between the two halves (Spacer kit C-AJJ4021) If using vented discs the drive flange must also be changed to the relevant type NAM6450F. When fitting the calipers ensure the wheel studs are sitting flush in the flange or disc as they should be in standard form and not fouling in any way. Read more
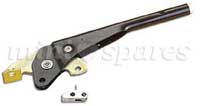
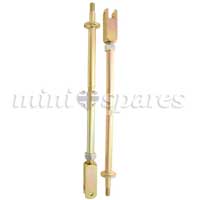
Unbolt handbrake from car and then remove rivet
(1) Once rivet has been removed, pull operating rod
(2) with pawl
(3) attached from handbrake, via plastic knob end. The original pawl will need replacing by removing the flat headed rivet
(4) The rod now requires bending true to plane, about 70mm from the hole end, down about 25mm.
(5)Although the new pawl is a different shape you are also moving fitting points from top hole to bottom hole, hence a bend of 20-25 degrees. Read more
These are to replace the standard bottom arms to facilitate easy adjustment of camber angles.
To fit, pace car safely on axle stands, remove front wheels to ease access, remove tie bar bolt where it joins the bottom arm, break bottom hub ball joint on outer end of arm, then remove the inner arm pivot pin. Adjust the spherical rod end by screwing in or out to set it to a similar length from the centre of the inner pivot point to the centre ... Read more
Fitting Instructions
Remove grille and overriders (if fitted the overriders can’t be refitted) Remove the centre fixing nut from the bumper, fit the centre support bracket using the bumper nut and washer, bending the bracket towards the apron mark off and drill hole after offering bar up. Loosely assemble the 2 end brackets and then check alignment. The right angled sections of the brackets bolt to the front panel and lower part of the apron. Contents: Lamp Bar Right Hand Bracket Left Hand Bracket Centre Bracket
Read more
Contents:- Part Number Description Quantity
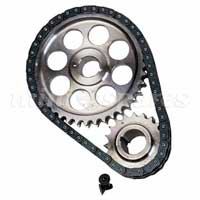
C-AEG578 Camshaft sprocket, lightened adjustable x 1
AEA695 Crankshaft sprocket x 1
2H4905 Timing chain x 1
AEA687 Screw - countersunk x 2
2A759 Locktab for cam gear x 1
The front plate will have to be countersunk as shown ’X’ to take the screws AEA687, which replace the existing hexagon-headed screws, which would foul on the timing chain. Check for clearance on chain all round and align gears as per Workshop Manual.
Read more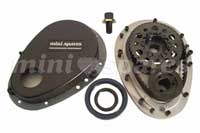
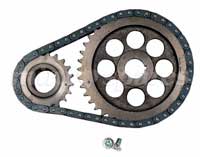
The application of this drive system maintains very accurate and consistent cam and ignition timing, and minimising valve train noise. Desirable advantages that do not diminish with time. The fiber glass reinforced belt all but eliminates excessive stretch suffered by chain driven systems - even where a tensioner is used. The protracted control of cam and ignition timing maintains peak performance. Chain drives cause excessive timing scatter, even after relatively short periods of running. Read more
The application of this drive system maintains very accurate and consistent cam and ignition timing, and minimising valve train noise. Desirable advantages that do not diminish with time. The fiberglass reinforced belt eliminates the excessive stretch suffered by chain driven systems - even where a tensioner is used. The protracted control of cam and ignition timing maintains peak performance. Chain drives cause excessive timing scatter, even after relatively short periods of running. The MINI SPARES kit enables A-series owners to benefit from such technology. The adjustable cam gear in this kit allows up to 9 degrees of adjustment, facilitating accurate cam timing. An absolute must when installing a performance camshaft.
FITMENT: Remove the original timing cover. Position gears so that the timing marks on cam and crank gears are adjacent, then remove gears/chain assembly. Remove locating keys. Clean cam and crank gear boss surfaces, ensuring new gears are no more than a light slide fit. Re-fit keys. Re-check gears for light slide fit. Read more
The front plate will have to be countersunk as shown ’X’ to take the screws AEA687, which replace the existing hexagon-headed screws, which would foul on the timing chain. Read more
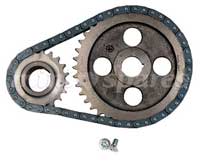
The front plate will have to be countersunk as shown “X” to take the screws CMZ407, which will replace the existing hexagon headed screws, which would foul on the timing chain. Check for clearance on chain all round and align gears as per workshop manual, When using “A” plus timing covers there is a small round pressing at the bottom which needs making flat to allow timing chain clearance. Read more
Contents
PART NUMBER DESCRIPTION QUANTITY
12G1397 CAMSHAFT SPROCKET 1
12G1699 CRANKSHAFT SPROCKET 1
2H4905 TIMING CHAIN 1
CMZ407 SCREW-COUNERSUNK 2
The front plate will have to be countersunk as shown “X” to take the screws CMZ407, which will replace the existing hexagon headed screws Read more
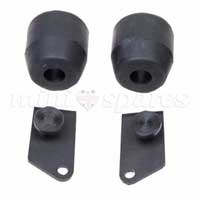
This kit is intended for all hydrolastic minis, although it has been fitted on to dry suspension cars to give improved handling characteristics during motor sport events. Check all clearances of brake pipes and hoses and relocate if necessary. On dry suspension radius arms there is no hole for the bump stop bracket. Read more
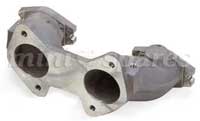
Build the manifold up before fitting to the car. The two spherical ended joints screw into the inlet manifold using the flat washers and nuts to lock them into place. The 5/16” rod is a tight fit into the two joints and care must be taken when fitting. The two linkage brackets fit either end of the 5/16” rod outside of the spherical joints using the 5mm nut and bolt to secure. Fit the small rose joints either end of the threaded rod and fit to the throttle linkage on the side required for the Weber carb being used. The 5” metal bar fits in a vertical position to the manifold, secured on the original manifold studs when fitting to the engine. Read more
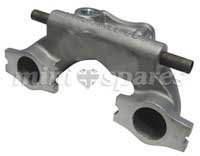
These single SU carb manifolds were developed to provide optimum airflow and air speed for the vast majority of road-used cars. The development program saw a significant increase in efficiency following production to the point where they are the best 'off the shelf' manifolds on the market for a majority of applications, including motorsport where only a single SU is allowed, yet not at extreme expense since sand casting methods were employed to keep costs down. Read more
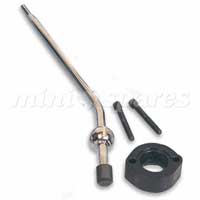
Remote Change
1. Remove original gearstick. Fit Quickstick with original plastic collar, spring and spring retainer, grease well and refit with new spacer. Place flange downwards using longer 5/16” UNC capscrews. Read more
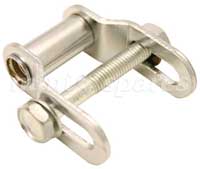
This bracket is designed to adjust the rake/height of the steering column and wheel. Incorrect fitment will cause premature wear and damage to steering column and rack, so the following MUST be adhered to.
1. Remove column to mounting bracket shear bolt. If the bolt head has actually been sheared off, this is easily accomplished using a small centre or pin punch, working around the edge of the... Read more

This window channel is now supplied without water drain holes
The drain holes can be identified as the larger 6.5mm holes in the chromium plated glazing strip.
The smaller holes in the glazing strip are used for fastenings to affix the channel and glazing strip to the door frame.
TO MAKE DRAIN HOLES IN CHANNEL;
Use chromium plated glazing strip as a template.
Mark drain holes on closed face of Channel.
Using a 3mm drill bit, carefully drill pilot holes through closed face of channel as marked. Read more
These rods have been produced to improve car stability when cornering and braking and to facilitate easy adjustment of caster angle. Manufactured from a high-grade material in a much bigger diameter they are less susceptible to bending than the standard items. Read more
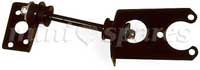
1. This is an auxiliary steady bar kit and should not be used to replace any other standard fitment parts that have broken.
2. Remove the radiator support bracket from the radiator and the thermostat housing.
3. Slacken the nut retaining the exhaust manifold at the radiator end of the engine. Remove the exhaust manifold stud by tighterning another nut against the original manifold nut and then screwing the nut out of the cylinder head.
4. Remove the three bolts securing the bulkhead blanking plate as shown in the diagram. If the car has a heater pipe as indicated on the diagram then this should be disconnected at the engine.
Read more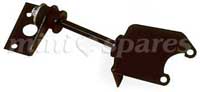
1. This is an auxiliary steady bar kit and should not be used to replace any other standard fitment parts that have broken.
2. Remove the radiator support bracket from the radiator and the thermostat housing.
3. Slacken the nut retaining the exhaust manifold at the radiator end of the engine.
4. Remove the three bolts securing the bulkhead blanking plate as shown in the diagram. If the car has a heater pipe as indicated on the diagram then this should be disconnected at the engine. Read more
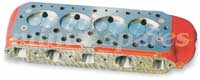
Modified to give maximum performance gain for cost. Combustion chambers, inlet and exhaust ports extensively reworked. Stone-ground finish in ports promotes ultimate atomisation. Three angle valve seats in head. Standard Cooper ‘S’ size valves used. Combustion chamber volume used to boost standard compression ratio slightly for given application. Head mods applied greatly increase Volumetric efficiency, boosting actual working compression ratio. Compression ratio needs to be increased on lower compression engines where modified cam is used to maximise potential. Seek advice on what is needed.
Before fitting to engine, ensure block and head mating surfaces are thoroughly cleaned. If fitting to a new/re-machined block... Read more


Contact Us| About Us| Terms| Switch to main website
Copyright @2014 Mini Spares. All rights reserved e&oe.